Tag Archives: Appetizers

Copper River King Salmon

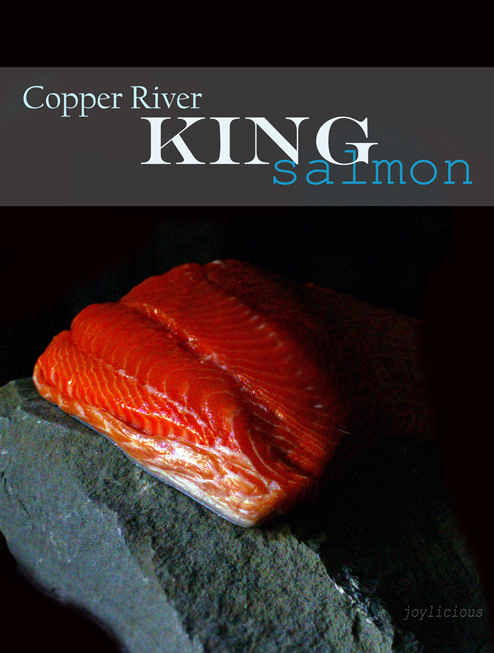
Out in Alaska runs Copper River whose name derives from the rich copper deposits found along its banks.  It’s fed by 12 tributaries, is a mile wide and runs at 7 miles per hour.  Besides being the 10th largest river in the US, it also is home to the best salmon in the world — flourishing in the “pure positive environment that creates salmon perfection.”


This Summer I’ll be representing Dallas as one of the Copper River Salmon Fresh Catch Crew Members where I’ll be pointing out places I spot CRS through my Facebook Page and Twitter and sharing all the wonderful recipes I’ll be making using Copper River Salmon.  My first shipment arrived last week: Copper River King Salmon — the king of quality, flavor and nutrition.  Prized for its exceptionally high oil content, succulent texture and rich flavor, this luxury fish literally melts in your mouth.


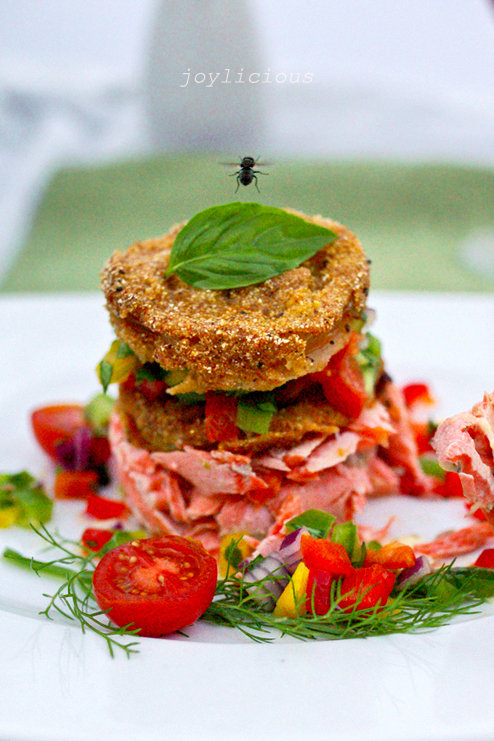
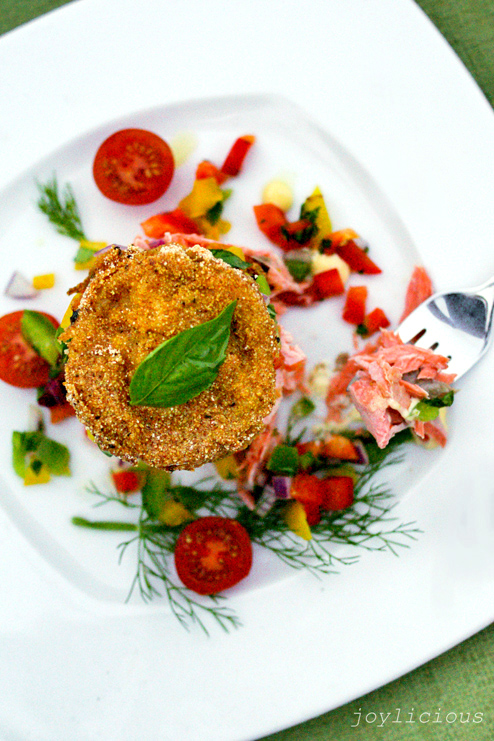
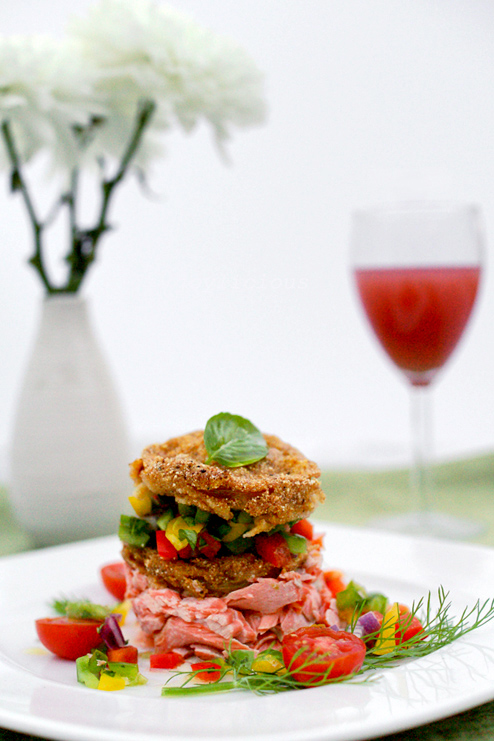
Can ya’ll imagine my excitement when he finally arrived ( I think it was a he…)?!!?! I wanted to come up with a recipe that allowed the salmon to shine like a star. With the hot Summer temperatures we’ve already been having in Texas, I kept in mind of what a good Summer dish entails: light and colorful, with just a hint of acid, and a plus if it’s healthy (cuz it’s swimsuit season y’all!). Can I have a drum roll please? I present to you: Grilled Copper River Salmon with a Herbed Tri-Pepper Salsa and Fried Green Tomatoes.


I love the versatility and simplicity of this dish.  It can be served warm or cold, it’s easy to make and plate (for family dinners or parties) and it’s freaking delicious AND healthy!!  I know. Life is good, it’s reeeeeaaaal good, like this recipe 🙂  Don’t forget to follow my Facebook Page and Twitter for updates on where I spot Copper River Salmon in the Dallas area!

Despite the fly RUDELY inviting himself into my shot, I thought this turned out to be a pretty cool picture after all.  Can’t blame the fly for having good taste in salmon 🙂


Copper River King Salmon
Recipe Type: Appetizer
Author: Joy Zhang
Prep time: 20 mins
Cook time: 30 mins
Total time: 50 mins
Serves: 6-8
A perfectly grilled Copper River King Salmon fillet served with a Basil Tri-Pepper Salsa and Fried Green Tomatoes. The perfect appetizer for Summer!
Ingredients
  • 2 pounds Copper River King Salmon fillet
  • 1/2 cup olive oil
  • kosher salt and pepper to taste
  • 1/2 cup green bell peppers, chopped
  • 1/2 cup red bell peppers, chopped
  • 1/2 cup yellow bell peppers, chopped
  • handful of fennel, chopped
  • handful of fresh basil, chopped
  • 1/2 lime squeezed
  • 2 teaspoons honey
  • pinch of salt
  • 2 pounds green tomatoes, sliced
  • 2 cups flour
  • 3 eggs, beaten
  • 1/2 cup milk
  • 3 cups corn meal
  • 1 tablespoon Cajun spice mix
  • 2 teaspoon salt
  • 1 cup vegetable oil
Instructions
  1. Heat grill and follow salmon cooking instructions located below in “Notes”. I used a charcoal grill and cooked a 4″ thick 2 pound salmon fillet in about 20-25 minutes over medium heat (NEVER COOK FISH ON HIGH HEAT WHEN GRILLING)
  2. Meanwhile, prepare your tri-pepper salsa. In a large bowl mix the chopped peppers, basil, fennel, lime juice, honey and a pinch of salt together, adjust flavors to your liking. Refrigerate until ready to use.
  3. Next prepare your fried green tomatoes. Slice the tomatoes about 1″ to 1 1/2″ thick and dust in flour. (I keep scraps and butts as my “test batch” to make sure my oil temp and flavorings are right.) Beat the eggs and milk together until combined. In a large pan mix the cornmeal, Cajun mix and salt thoroughly together. Dip the dusted tomato slices in the egg and milk mixture and then coat generously in the cornmeal mixture. Set pieces aside in a large plate or pan.
  4. Line a large baking sheet with paper towels to drain the tomatoes when you fry them. Take a large cast iron skillet and heat vegetable oil over medium high heat, about 4-5 minutes. Using one of your test pieces, drop it into the hot oil and see how long it takes to cook. It should take about 3-4 minutes for a nice golden brown, adjust temperature of heat accordingly. Once oil is ready, line the pan with tomato slices, making sure they do not touch one another. Cook until golden brown on both sides. Remove from heat and drain on paper towels. When ready to serve, reheat in oven on a wire rack at 400F for 10 minutes.
  5. To serve: You can serve this appetizer in martini dishes or to plate them the way I do simply use a hollowed out can. Break up the salmon fillet into big chunky pieces and layer it on the bottom. Place a slice of fried green tomato on top of the salmon and then spoon the tri-pepper salsa next. Finish off with one more slice of fried green tomato and garnish with fresh basil and herbs. Serve immediately.
Notes

How long do I grill salmon? (from http://www.howtodothings.com/food-and-drink/a1889-how-to-grill-salmon.html)

How long you grill salmon (and most fish) is based on the temperature of the fire, the thickness of the fish at its thickest part, and the distance of the grill rack from the heat source. Never let salmon touch the flames on the grill.

Most fish cook quickly. A good rule of thumb is to grill fish for approximately 8-10 minutes per inch of thickness cooking it at 4-inches above the heat source. For grilling salmon, use the following as a guide:

* Salmon Filets: will cook in approximately 4-5 minutes. Do not turn over when grilling.
* Salmon Steaks: will cook in approximately 4-7 minutes. Turn once to cook on both sides. You can also sear the outside flesh on a hot grill and finish grilling on medium heat.
* Whole Salmon: Cook slow and low. Use the thickness rule stated above.

Again, these grilling times are approximate. Always keep a sharp eye on the salmon to keep it from overcooking. Fish does not hold its heat well so always serve the salmon immediately after grilling.

So, how exactly do I grill salmon?

1. Choose the type of salmon you want to grill (filet, steak or whole). Some recipes require specific types of salmon.
2. Lightly oil the grill rack or two-sided grilling basket by spraying or brushing on olive oil before placing salmon directly on the grill. (There is no need to do this step if you are grilling salmon in an aluminum foil pouch.)
3. Preheat the grill to a medium-high heat (300 and 325 degrees). Grilling salmon on a gas grill is ideal, but if you are using a charcoal grill, remember that the coals are generally ready when they are bright red and all actual flames have subsided.
4. Grill the salmon based on approximate grilling times noted above, making sure no flame touches the fish directly. The finished grilled salmon will flake gently when you part it with a fork and the flesh will feel firm when pressed. Like meat, salmon continues to cook a little bit after it is removed from the grill so it is better to remove it when it looks a tiny bit raw or deeper pink inside. Grilling salmon slowly and steadily over a medium heat will allow the fish to retain most of its own juices.
5. After you grill the salmon, serve it immediately.
Tagged , , , , , ,

Radish Arugula Goat Cheese Crostinis

I was daddy’s little girl growing up.  I was his constant shadow — anything he did, I’d do, anywhere he went I’d follow.  He’d tell me stories of his past, about that far away place I knew so little about.  “I was only 17 when I went away to work on the farms…we’d have little to eat…there’d be snakes in the bed…” I’d listen to his tales with fear imagining giant cobras lurking beneath his bed.  My eyes widened.

You see here?” He’d point to a deeply embedded scar on his leg — “I got these from leeches.  I’d work in the rice fields all day long and there’d be thousands of leeches everywhere.” I touched the deep grooves around his shins.  “Do they still hurt?” Sometimes.” He’d say.

I could see the ghosts lingering within him, though however dark his past may have seemed he always kept his knack for gardening.  After 7 years of working on a farm, it becomes part of you; a part that you try so hard to forget yet at the same time you can’t let it go.  After moving into our first home in America that was one of the first things he did: start a garden.  Together we’d clear the grass, break up the dirt, till the soil and plant the seeds.  I admit, I was mostly in charge of fetching glasses of water and picking out the grubs and squishing them with my shovel but it quickly became something I’d look forward to doing with dad every season.

He’d plant all sorts of things: squashes, wintermelon, cucumbers, peas, mustard greens — he would take fish carcasses and let them ferment in the sun.  Once the mixture was putrid and broken down, he’d mix it in with the soil.  It horrified me, as I screamed and held my nose tightly every time he pulled the “magical” mixture out.  We harvested a 38 pound wintermelon that year.

My father had the ultimate green thumb, there was no doubt about it.  Each year our harvest would be so full and bountiful we’d often give most of it away because there was no way in hell we’d be able to eat it all.  So it was only natural for me to carry on my dad’s green thumb by making helping Collin start a garden in our first home.  To be honest, my thumb is anything but green.  Collin actually calls it my black thumb since I tend to kill all plants I buy.  (It often makes me question my abilities of becoming a good mother but we’ll save that for another day.)  The point is, I found two veggies that seem to be fool proof: Radishes and Salad Greens.  I literally threw seeds in the ground, kept them well watered and BAM!  Six weeks later, I have freshly grown vegetables: (Wells) Farm to table.

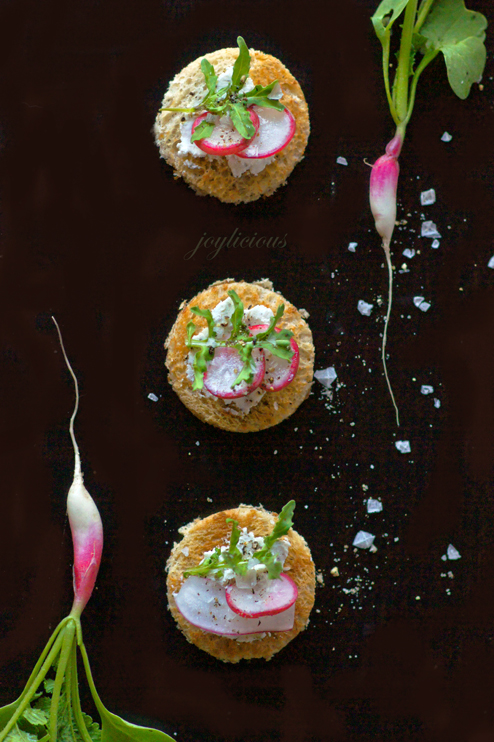
I paired the radish and arugula with some tangy and creamy herbed goat cheese, coarse kosher salt and freshly ground black pepper on top of a crunchy wheat crostini – fresh simplicity at its finest.  What plants seem to grow well in your gardens?

Ingredients for Radish Arugula Goat Cheese Crostinis

(Serves 2-4; Total Prep Time: 10 minutes Total Cooking Time: 10 minutes)

  • 6 Cherry Bell or English Breakfast Radish, thinly sliced
  • 1/2 cup fresh Arugula
  • 4 oz herbed goat cheese
  • 4 slices wheat bread, toasted and cut into 2″ circles (about 2 circles a slice for a total of 8)
  • coarse kosher salt and pepper

To assemble crostinis, spread about a nickle sized dollop on each crostini.  Top with a couple slices of radish, arugula and sprinkle with a pinch of kosher salt and pepper.  Serve immediately or refrigerate until ready to serve.


Tagged , , , , , , , , , , ,

Grilled Red Fish and Shrimp Ceviche

My very first professional cooking job was at one of the top French restaurants in Tucson, Arizona.  It took me over two weeks and hundreds of applications before I was finally able to convince one of the head chefs to consider me for the position of Chef de Partie.  He was weary of taking me under his wing –

“You?  Girl?  You want to work in the kitchen?  This is no joke, it’s very hard work, are you sure you can handle it?”

“Yes Chef, I will not disappoint.”

Mind you, after 95% of the restaurants I applied to turned me down, having a top restaurant to even consider me for a position with absolutely no professional kitchen experience is what I call pure luck. He did not say yes right away however, but I was determined. That day, I went out and purchased the Jacque Pepin’s Complete Techniques and made the best damn Tarte Tartin my little heart could put out, sent him a slice attached with a note.  He finally considered my plea.

“Ok. Be here tomorrow morning at 6 am.”

So begins my journey through a real professional kitchen.

I show up bright and early and stepped foot into the small 10’ x 12’ kitchen, it was literally big (small) enough to fit 4 people snugly.  At the end of the table I see Chef kneading the dough for the fresh baguettes they make for dinner service, without even looking up from the task he points to the walk-in cooler –

“Grab 10 heads of lettuce and start prepping the salad station.”

It took me an hour and half to prep that station that day, Chef later informed me it needs to be done in 30.  Every single morning for 6 months (except Mondays) I met with the Chef and worked closely by his side – chopping, filleting, frying, sautéing.  I learned everything I had ever dreamed of and more: how to make the perfect pastry cream, pate chox, and the most beautifully risen soufflés.  I even learned how to properly fillet, tie and wrap a beef wellington, tips on how to never over cook fish, and how to keep your béarnaise sauce from breaking.

But my favorite recipes I remember to this day weren’t really so much the Classical French recipes I had learned (Don’t get me wrong, I loved every minute of it) but the traditional Mexican salsas and breakfasts Chef would make for me each morning.  Oh, did I forget to mention the head chef wasn’t French?  Yes, about that, everyone that worked in the kitchen was from Spanish speaking origins except me — Chinita Loca was my nickname: the Crazy Chinese Girl.

By the end of my stint in the restaurant kitchen my Spanish was superb, I was able to work 14 hour shifts without crying afterwards from being so damn tired, and I had enough burns and cuts all over my arms to be considered a “bad ass.”  Okay not really, but it was intense – by far the most vigorous working experience of my life both physically and mentally.  I wouldn’t have made it through those hard days without Chef by my side egging me on, pushing me to achieve my best.

One weekend I had worked two 14-hour shifts in a row, I was near exhaustion to the point where I felt delirious.  The kitchen was a blistering 114F during the summer and I was convinced I was going to die, every single muscle in my body hurt not to mention the idiotic two 2nd degree burns I had on my arms because I dropped the pan of baguettes that morning.  I slumped over the counter and rested my head on my arms, hoping to take a short break before the dinner rush.

“CHINITA LOCA!  WAKE UP!”  Chef shook my arm and popped me across the head with a dish rag – he slid me a heaping plate of freshly fried tortilla chips and some ceviche he had whipped up out of the blue.  “Here, eat.”  I sluggishly scooted towards the plate as he shoved a heaping chipful of ceviche into my mouth.  My eyes widened: it was glorious – the sweetness of the shrimp paired with the tangy brightness of fresh lime and cilantro, instantly I felt my mood elevated.  It was like a punch in the mouth, but in a good way, a happy way, a reenergizing way.  I smiled warmly – “Thanks Chef, this was awesome.” “Of course Chinita! I made it!  Now go prep your salad station.”

I prepped my station in 30 minutes that day, the first time since working there.  I’m convinced it was Chef’s ceviche that made it happen. He taught me speed, accuracy, timing.  He taught me the importance of planning, execution and presentation. He taught me no matter how different we may be from each other, at the end of the day we’re all the same: we cook because we connect, we cook because we love, we cook because we inspire. Thank you Chef for inspiring me and I hope this recipe will inspire you.  You can use just about any combination of seafood for ceviche: shrimp, various fish, scallop, lobster.  For this recipe I chose shrimp and grilled red fish and paired it with an avocado mango salsa– a nice contrast between textures and flavors this would be a great appetizer for a dinner party or bbq that’s quick, healthy, easy and delicious.


Ingredients for Grilled Red Fish and Shrimp Ceviche (serves 6-8):

Prep Time: 20 minutes; Total Cooking Time: 60 minutes


  • 1 red fish fillet (about 1 pound)
  • 2 teaspoons Seasoned Salt
  • 1 pound medium shrimp, peeled and deveined
  • 1/2 cup plus 2 tablespoons fresh lime juice
  • 1 teaspoon honey
  • 1 to 2 tablespoons Tabasco
  • 1/3 cup chopped fresh cilantro, plus several sprigs for garnish
  • 1 cup diced mango
  • ½ cup red cherry tomatoes
  • ½ cup yellow cherry tomatoes
  • 1 large avocado, peeled, pitted and cubed
  • Kosher salt
  • Freshly ground black pepper
  • Several limes for garnish
  • Tortilla chips

Prep the grill.


Pat fillet dry with paper towel and evenly coat with seasoned salt.  Place red fish fillet in a wire fish basket or a buttered foil packet.  Place in the center of grill for 15 minutes then flip and cook for an additional 10 minutes.  Set aside and allow to cool.  To make sure fish is fully cooked, the meat will be white and easily pierced with a fork.


While fish is cooking on grill bring a quart of water to a boil.  Place shrimp in the hot water, cover and let the water return to boil.  Immediately remove from heat and strain and run under cold water until cooled.  In a large bowl mix ½ the lime juice, honey and Tabasco and mix with shrimp.  Refrigerate for about an hour.


Meanwhile prep the salsa.  Mix chopped cilantro, mango, tomatoes, avocado and remainder of the lime juice in a medium bowl.  Season with salt and pepper and refrigerate until ready to serve.


You can either serve ceviche in small glass cups or martini glasses for an extra touch of elegance.  Layer with salsa, shrimp and grilled red fish and garnish with cilantro, shrimp or lime wedge and immediately serve with tortilla chips.

Tagged , , , , , , , , , , , , ,

Scardello Artisan Cheese and JJ&B Artisan Spreads

So it’s time to join me on a food adventure where we will tour the top artisans in Dallas that will be featured through Artizone — this week I will be featuring Scardello Artisan Cheese and JJ&B Artisan Spreads.

Scardello Artisan Cheese, rated by D magazine for Best Cheesemonger has a selection that would impress even the pickiest foodie. Rich searches for the best European and local cheeses in so many different varieties that the combinations seem endless.  At JJ&B, Kathy makes magical combinations through her artisan spreads — Apple Pie Jam perfect over ice cream or Sweet Onion Jam to garnish a steak.  It adds the perfect touch of elegance and wonder into any meal or dessert.

I decided to combine their artisan powers and produced two simple recipes.  Using a creamy brie from Jasper Hill Farms in Vermont, the Moses Sleeper has a mild, gentle and savory flavor that taste of milk, hay and butter.  I melted the brie and paired it with JJ&B’s Toasted Pecan Pepper Jam and crackers– a simple, elegant, heavenly appetizer that would serve well for any occasion.  I also made beggar’s purses made of phyllo which I stuffed with goat cheese and JJ&B’s Sweet Onion Jam.  A sweet and savory combination that would please any crowd!

Ingredients for Warm Brie and Toasted Pecan Pepper Jam Appetizer: (serves 10-12)

  • 1 lb Scardello’s Moses Sleeper Brie
  • 1 jar  JJ&B Toasted Pecan Pepper Jam
  • crackers for dipping

Preheat oven to 350F.  On an oven-proof plate, place the Brie in the oven for 5 minutes or until fully melted.  Place jar of Toasted Pecan Pepper Jam on top and serve with assortment of crackers.  Best served immediately.

Ingredients for Beggar’s Purses with Goat Cheese and Sweet Onion Jam: (serves 10)

  • 1 package of Phyllo dough
  • 16 oz Scardellos’ On Pure Ground Goat Cheese
  • 1 jar JJ&B Sweet Onion Jam
  • 2 tablespoons butter, melted
  • 1 package of chives, blanched

Cut the phyllo dough into 3″ squares and brush with melted butter.  In each square place 1 tablespoon goat cheese with 1 teaspoon sweet onion jam.  Gather phyllo around filling and tie 1 or 2 blanched chives in a knot to close the purse.  Trim the ends of chives if necessary.  Preheat oven to 350 degrees.  Bake for 8-10 minutes or until phyllo is a golden brown in color.  Serve immediately.

Tagged , , , , , ,

Ribeye Crostinis with Caramelized Onions and Bleu Cheese

As part of the Foodbuzz Tastemaker Program, I received Nature’s Pride Multigrain bread and was asked to create an award winning recipe that would win me a trip to San Francisco to attend the 2nd annual Foodbuzz festival.  Seeing that I absolutely adore San Francisco and I love to eat and drink (ALOT), what other choice did I have but to take a shot and enter?


Now last year, right after I became a featured publisher on Foodbuzz I found out about the festival and by that time it was too late.  This year, with purchasing a new home and planning a wedding, my funds have become dismal, insufficient, practically…nonexistent.   I realize the only way that I can get my happy ass butt out there is through this contest.  Now that wasn’t a sob story to make you feel sorry for me and pick me (…not that I’d mind by any means) but I hope my recipe inspires people to look at sliced bread in a different way….an elegant way.

I chose to make hor d’oeuvres as preparation for my housewarming this weekend and kept the following things in mind:

  • – simple preparation
  • – minimal cleanup
  • – delicious flavors
  • – beautiful presentation

So I came up with Ribeye Crostinis with Caramelized Onions and Bleu Cheese! These little morsels are packed with flavors that will be a hit at any party or soiree — just be sure to make extra because they’ll be gone in a heartbeat.  Enjoy 🙂

Ingredients for Ribeye Crostinis with Caramelized Onions and Bleu Cheese:(serves 12)

  • 6 slices of Nature’s Pride Wholegrain Bread
  • 8 oz ribeye
  • 1 small onion, thinly sliced
  • 4 oz container bleu cheese crumbles
  • 1 cup field greens
  • 1/4 lemon, squeezed
  • 1 teaspoon olive oil
  • 4 tablespoons butter
  • kosher salt & pepper to taste

In a medium saucepan over medium heat, melt 2 tablespoons butter and once bubbling add the sliced onions.  Allow onions to caramelize, about 4-5 minutes.  Do not move the onions around too much, this slows down the caramelizing process — stir every couple of minutes and once done, set aside.

Start searing the ribeye next.  Heat a skillet at medium high heat with a tablespoon of butter, sprinkle each side of the steak generously with kosher salt and pepper and once the pan is hot and butter is bubbling, sear each side of the steak — about 3 minutes on each side.  Remove from heat and place the steak on a pan in a toaster oven at 400F for an additional 4 minutes.  Set aside for 5 minutes to allow juices in the meat to settle.

Meanwhile, prep your bread and salad greens.  Using a 1 1/2″ circle cutter, cut out two circles from each slice of Nature’s Pride Multigrain Bread and using the skillet that the steak was cooked in, melt an additional tablespoon of butter at medium low heat and toast each side of the bread pieces, about a minute on each side.  Mix greens in a bowl with a little bit of olive oil, lemon juice and a pinch of salt and pepper.

Thinly slice ribeye steak and place ontop of the toasted Nature’s Pride crostinis.  Garnish with greens and top with caramelized onions and bleu cheese crumbles.  Serve immediately.

Pairs well with a sweet Riesling or a smooth Merlot.

—–

Hope you guys enjoy my recipe.  Happy Friday and have a great weekend!

Tagged , , , , ,